
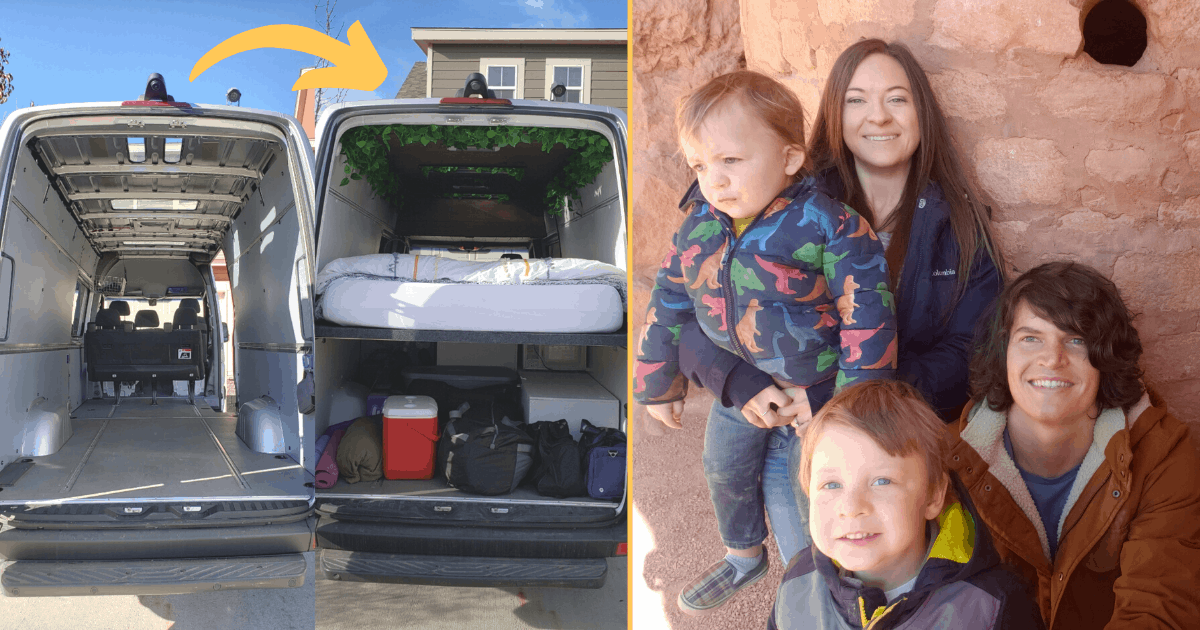
How We Built a Campervan for Our Family of Four
“What if we bought a hippie van and threw a bed in the back?”
This is the question I asked myself that led us to where we are right now: driving from Colorado to Florida for a month-long family adventure in our newly-converted campervan. I had just watched a documentary about Woodstock, and seeing those hippies itched my desire to get out, see the world, and be free ― in a family-friendly way of course. 😉
Hi fellow human! Thanks for visiting my personal blog. I’m an intentional family man who is currently passionate about parenting, family culture, homeschooling, and self improvement. This blog isn’t a business. It’s just my way of connecting with people with just as much passion for these topics as me. So, if you enjoy my musings, be sure to reach out.
Inside our Campervan

Master bed on a floating platform

View from the front

View from the back

Microwave, dresser, and cabinet with fridge/freezer

Kitchen table slides out from under the bed

Foot pump kitchen sink with a REAL kitchen faucet!

Loft bed for the boys, which doubles as storage when not being slept in

Loft bed with the door closed
WHY WE WANTED A CAMPERVAN
After doing a quick search online for hippie vans, I discovered this thing called the #vanlife. I found out that people (even families) build out cargo vans and live in them full-time. While we currently don’t see ourselves living in a van full-time, it gave us motivation to join the movement part-time: weekend trips, personal retreats, couple retreats, and long road trips to Florida (you can tell I’m excited to get to sunny Florida…).

Starting our drive to Florida!
More Enjoyable Vacations
After having kids, I quickly began to realize that family vacations are not really vacations for the parents. They are more like working double shifts at the ER day after day. Okay, not that bad, but you are just busy the whole time: How long will it take us to pack? Who’s going to sleep where? Will naptime even work? What can we do that will be fun for the kids today? How can we keep the kids entertained while we are driving? Will we even survive the airport?
This was a huge motivation for us: how can we make family vacations more fun and peaceful for us and the kids? We realized that a campervan would allow us to:
- Pack for trips quickly. Before having kids, I could pack for a vacation in 10 minutes or less. Now, it can take up to 10 hours (and we still end up forgetting something). With a campervan, most of our stuff is already packed in the van, so we can pack for a vacation in less than an hour.
- Get good sleep. As a family, we have a hard time sleeping without the right environment. We need the right beds, pillows, and stuffed animals. We also need the right amount of darkness, privacy, and white noise. With even just one of these factors off, a good night’s sleep may be out of reach, which makes having restful, enjoyable vacations difficult. With a campervan, we can craft the perfect sleeping environment and take it with us everywhere we go.
- Have naptime. Naptime is one of the most crucial parts of our day. It is time for Lindsey and I to have some relaxation time, and it is time for each boy to relax and recharge (whether that means sleeping or just playing by himself). On vacations, not only does the lack of the right sleep environment make naptime difficult, it is also difficult to fit naptime in between fun activities. With a campervan, we can go to a fun park, and then just do naptime right there in the parking lot. And when the boys wake up, they can jump right out of the van and start having fun again.
- Enjoy our travel days. On the typical family road trip, we’d try and drive as far as we could everyday. This was tough on the boys and by the time we’d reach our destination, they’d be screaming and everyone would be exhausted. Not a great way to start a vacation… With a campervan, the destination is of little importance. As soon as we step into the van, we are already on vacation. We stop at fun parks all along the way, making for much more enjoyable road trips.

Meeting up with one of Lindsey’s friends at a park on our way to Florida
Campervan vs. Cabin
Ever since becoming a dad, I’ve always dreamed of having a cabin. I thought it would be so cool to have a home away from home dedicated to making fun family memories.
After researching this option, however, I realized how ridiculously expensive it is to buy a vacation home. It would cost more than our home itself! And even if we did fork over the money for a cabin, I think it would limit our family adventures because we’d feel obligated to stay at the cabin a certain amount of time each year in order to make it worth it.
A campervan is 10x less expensive than a cabin, and you can go anywhere in it. Another benefit is that you don’t have to pack your car, unpack into your cabin, pack back into your car, and unpack when you get home. Your cabin and car are one in the same.
Campervan vs. RV
We thought about getting an RV, but not only are they more expensive, they weren’t customizable enough for us. Like I said before, we require very specific sleeping environments, and most of the RV layouts didn’t quite work for our unique situation.
Also, most RV’s require that you rearrange a table into a bed, which makes getting ready for naptimes and bedtimes take that much longer. We wanted our beds to always be set up and ready to go, so the campervan allowed us to devise the exact arrangement that we needed for this.
Additionally, we wanted a vehicle that we could stealth camp in (sleep in it without other people suspecting we are sleeping in it). While our campervan has solar panels on the top, it still screams “I’m camping!” less loudly than an RV.

Even after putting solar panels up, most people wouldn’t know it’s a campervan.
Campervan vs. Camper
Up until the very end, we were on the fence deciding between a campervan or a camper. We liked the camper idea because it would be less expensive than a campervan, and it would sleep all four of us with room to spare.
In the end, however, we went with the campervan because we didn’t want to have to tow something behind us, wanted the option of stealth camping, and thought a campervan would be easier to customize. Another nice thing about the campervan is that we can switch from driving mode to eating mode to sleeping mode without ever taking a step outside the vehicle. Having everything in one place is super convenient, especially when the weather is unpleasant.
Make a List of Required vs. Wanted Features
Something that really helped us make the final decision to go with a campervan over the other options was to make a list of required features and wanted features. For required features, we listed everything that we knew we couldn’t live without in our campervan such as:
- A purple bed (our preferred mattress brand)
- Beds for 4 people that are always set up
- Seating for 4 people with car seats that are always set up
- Heating for winter
- Cooling for summer
- Good insulation for all four seasons
- Enough storage space
- Large fridge and freezer
- Microwave
- Sink for brushing teeth and refilling water bottles
- Easy-on, easy-off window covers
- The ability to stealth camp
- Access to electricity even when van isn’t running
- Simple toilet
- Beautiful interior
- Windows on the sides
- Ability to insure it as a class B motorhome
- A total cost for van and conversion of less than $60,000
Here are some of the wanted features we listed:
- Lighting in the cargo area
- A counter/sink area for brushing teeth
- Adjustable-height bed frame
- Swivel seats up front that turn to form a family table
- Space between the boys’ seats
- Ability to expand to seat and sleep 6 people someday
- Back up camera
- Wet bath or camping shower
- Solar panels
It wasn’t a perfect list, and we thought of new feature ideas as we built it out, but having a general idea of what we wanted helped us realize that a campervan was the best option for us. As I will discuss later, having a features list like this also helps when deciding which van to purchase and in planning out the conversion.

Brushing teeth in our newly-converted campervan!
HOW TO FIND THE RIGHT VAN FOR YOUR CAMPERVAN CONVERSION
The most important decision we made in our campervan conversion journey was which van to buy. There are so many factors to consider, and we didn’t want to end up spending hundreds of hours on a van only to have it break down on us. It is crucial to take your time in this process.
Used vs. New
At first we were planning on buying a new vehicle, but ended up deciding to get a used vehicle for several reasons:
- No wait time. We wanted to get a Ram Promaster or a Mercedes Sprinter, and after talking with dealerships, we found out the wait time would be at least 4 or 5 months. We wanted to start building out our campervan as soon as we could, so this was the most important factor in deciding to simply get a used vehicle.
- More affordable. We ended up getting a 2016 Mercedes Sprinter with 127,000 miles on it. From what we’ve heard, these vehicles are built to last 300-400,000 miles. Our van would’ve easily cost over $60,000 if we’d bought it new with all the same features. We got it used for just $28,451, giving us ample room in our budget to convert it exactly how we wanted to. To give you an idea, we spent $16,952 on the conversion, so the total cost for our campervan ended up being $45,403, almost $15K below our initial budget.
- Less Risky. You may think you want to convert the van yourself, but what if you start working on it and realize this project is way too much for you to handle? If you start putting holes in a new vehicle, you have just lost $10K+. With a used vehicle, you can always back out without losing anything but the time you spent on it.
- Less Pressure. You may think you know exactly what you want in your dream campervan, but after even just a couple weeks of using it, I’m sure you’ll already start making a list of features you want in dream campervan 2.0. So, when you get a used van for your first campervan, you are decreasing the pressure to get it perfect the first time.
- Less Work. The van we found already had a fan, two big side windows, sunroofs, walls, flooring, insulation in the walls, and a bench seat. If we would have bought a new vehicle, we would have had to buy and install all of this ourselves. For this reason, I’d highly recommend buying a partially-converted van.

Our used van came with a fan, two big side windows, sunroofs, walls, flooring, insulation in the walls, and a bench seat.
All this being said, it still helps to go to a dealership and check out the new models. This might help you decide between a Mercedes Sprinter or Ram Promaster, two of the most common vans used for conversions.
Make a List of Questions to Ask
Once you are interested in buying a used campervan, the search begins. It can be easy to waste hours mindlessly paging through Craigslist and Facebook Marketplace. To give yourself some direction and stay focused on your goal, I’d highly recommend creating a list of questions to ask about each vehicle that catches your eyes. We divided our list into three categories: (1) Questions to ask first, (2) Questions to ask about the conversion, and (3) Questions to ask about the van.
1. Questions to Ask First
We thought of a few make-or-break questions that we wanted to answer first to help us quickly decide whether to investigate further or move on:
- Price: What is the price?
- Miles: How many miles are on the odometer?
- Second Row: Would it be easy enough to add a second row of seats if there isn’t one already?
- Impression: What are my overall thoughts on this one?
Answering these questions allowed us to quickly filter out most of the vans that caught our eye. The ability to have a second row of seats was hugely important to us, so we wanted to filter out any van that couldn’t handle a bench seat right away. The questions you choose to answer first will just depend on the features that matter the very most to you.
2. Questions to ask about the conversion
To come up with questions to ask about the conversion, we simply converted our required/wanted features lists into questions to ask. For instance:
- Built By: Was it built by the owner or a professional company?
- Insurability: Were you able to get sufficient insurance for the vehicle?
- Seats: Does it seat 4 comfortably? How hard would it be to customize to the point that it does?
- Sleeps: Does it sleep 4 comfortably? How hard would it be to customize to the point that it does?
- Heating for Winter: Can it be used comfortably during the winter?
- Cooling for Summer: Can it be used comfortably in the summer? Does it have a fan installed?
- Insulation: How is the van insulated?
- Fridge/Freezer: Does it have a fridge/freezer or an electric cooler?
- Microwave: Does it have a microwave or a space where we could put one?
- Electricity Access: What kind of electricity access is there? Are there easily accessible outlets? Can the electricity be accessed even when the vehicle isn’t running?
- Solar: Does it have a solar panel? Would it be possible to add at this point?
- Storage Space: What storage space is available? Would there be a good place to keep our suitcases?
- Toilet: Does it have a simple toilet that could be used for middle-of-the-night peeing?
- Stealth Camp-ability: Is it easy to stealth camp in? How obvious is it that it’s a camper?
- Aesthetics: How cute is the interior? How hard would it be to customize the appearance to what we want it to look like?
- Sink: Does it have a sink area for things like brushing teeth, washing hands, etc?
- Swivel Seats: Can the driver and passenger seats swivel to face backwards?
- Backup Camera: Does it have a backup camera or any other safety features?
- Shower: Does it have a shower?
- Other: What other nice features does it have?
3. Questions to ask about the van
We divided our questions about the van into two sections: (a) Questions to ask about the van before calling, and (b) Questions to ask about the van during the phone call.
a. Questions to Ask About the Van Before Calling
If you are really interested in a used vehicle, you’ll eventually want to go see it, test drive it, and buy it. That being said, you don’t want to waste your time driving out to see 5-10 different vehicles only to find out something you could have asked about over the phone. To avoid wasting time, we made a list of questions to ask before even calling them about the vehicle:
- Length: What is the length of the wheelbase?
- Height: What is the exterior height of the vehicle (fan included)?
- Aesthetics: Does the exterior look nice?
- Kelly Blue Book Value: What is the value of the vehicle itself on Kelly Blue Book?
- VIN: Could you provide me with the VIN so I can run an online VIN check?
- Title/Registration: Do you have a title, registration, and an up-to-date emissions test?
b. Questions to Ask About the Van During the Phone Call
If we were still interested in the vehicle after getting the first set of questions answered, we would call and ask additional questions about the van:
- Why: Why are you selling the van?
- Repairs: How many miles have you put on the vehicle and what repairs has it needed?
- Rust: Does it have rust? Have you gotten an estimate on the cost to fix the rust?
- Accident History: Has the van been in an accident?
- Service Records: Do you have up-to-date service records?
- Replaced Car Parts: What van parts are no longer original?
- Maintenance Location: Where have you been taking the van for maintenance?
- Previous Owner: Who owned the van before you?
- Air Bags: Have the air bags ever been deployed?
- Issues: What issues have come up with the car since you bought it?
- Car Use: Who has been driving the van, and what was the car used for?
- Pre-Purchase Inspection: Could we meet at a nearby mechanic where I could get a pre-purchase inspection done?
- Test Drive: Could I also do a test drive of the vehicle?
We came up with these questions after reading several articles about how to buy a campervan as well as general articles about how to buy a used vehicle. Because this step is so crucial, we took our time and did some careful research. By the time our dream van popped up on Facebook Marketplace, we were able to pull the trigger right away, knowing it was a good find.
One thing that helped in buying our used vehicle was that we bought it from a dealership, and they provided us with a CARFAX on the vehicle. The CARFAX report answered many of our questions, and it provided us with an accurate record of the vehicle’s maintenance and accident history, which were spotless in our case. You can look up the CARFAX of any vehicle if you have the VIN number and a CARFAX account. Well worth it in my opinion!
Bonus Tip: Don’t Forget the Pre-Purchase Inspection!
One other piece of advice is to always get a pre-purchase inspection done from an unbiased mechanic before making your purchase. It was tough to find one that would be able to look at our van on such short notice, but we kept trying mechanic after mechanic until we found one an hour away.
While driving to the mechanic, the check engine light came on, and the mechanic realized there were some issues that needed to be fixed. We got it put in the contract that the dealership would take care of the vehicle’s check engine light, which ended up saving us over $7,000 since the vehicle needed the entire exhaust system replaced. We are SO glad we didn’t skip this vital step.
HOW TO PLAN OUT YOUR CAMPERVAN CONVERSION
Once you have your van, it’s time to plan out the conversion step-by-step. To do this, simply take your list of required/wanted features and put them in chronological order. When deciding what to do first, I’d recommend going from: (1) Outside to inside, and (2) Most important to least important.
1. Outside to Inside
It is best to start out and move your way in. For instance, here is a general order in which you might build out your van:
- Exterior of the Vehicle. Install anything that will attach to the outside surface of your van. This might include a roof rack, windows, solar panels, ceiling fans, a rooftop AC unit, a ladder or bike rack on the back, etc.
- Behind-the-Scenes Structures. Before installing your insulation and flooring, it helps to install anything you don’t want in plain sight such as wires and pipes. You don’t have to actually install the electric system yet (batteries and inverter), but you’ll want to at least get wires put in place.
- Insulation. Install insulation in the floor (optional), walls, and ceiling of your van.
- Flooring, Walls, and Ceiling. Once you’ve added insulation, you can start installing the floor, walls, and ceiling of your van. I’d highly recommend a flooring and wall option that allows you to install L trac with it. L trac acts as an attachment point for all the interior structures you will install next. Essentially, instead of having to try and attach things to the metal structure of your van with screws, you can simply attach them with L Trac nuts and bolts to the L trac.

L trac runs along the walls and floors of our van, allowing us to attach anything we want using L trac bolts
- Interior Structures. With everything else done, you can install interior structures such as cabinets, bed platforms, a bench seat, box with electric in it, etc.
- Aesthetics. Once everything is installed, you can focus on finishing up the aesthetics of your van by adding hanging lights, a mirror, or any other finishing touches you’d like.
2. Most Important to Least Important
Building a campervan can take a long time. My wife and I both spent about 20-30 hours per week for about 2 months working on the van (approximately 300-500 hours total). As passive income entrepreneurs, we had a lot of freetime to work on the van, but I understand that not everyone has this luxury. If you only have weekends to work on your van, fully converting your van could take over a year. In fact, I have a friend who’s been working on his van for over 2 years now!
To avoid burning out, it might help you to build out your van in stages, taking it for test runs between each stage. For instance, for the first stage, you might simply throw a sleeping bag in the back and take it for a weekend camping trip. For the next stage, you might add the fan, walls, and insulation before taking it for another spin. Here’s the key: add the most important features first and then have fun with it as you build. Nothing can be more frustrating than spending months or even years on a project before getting to at least taste the fruits of your labor.
Testing it out periodically like this can also help you figure out what your campervan needs next. Maybe you’ll take it for a weekend camping trip and realize that you can’t live without a heater in your van. So, you’ll add it to your required features list. Like I’ve said before, it is very hard to know exactly what you want in your campervan upfront.

Joseph and Will testing out the loft bed
ESSENTIAL TIPS FOR BUILDING A CAMPERVAN
Before I start sharing how we built out each key feature of our campervan, I want to share some general principles to keep in mind. No matter what features you plan on adding to your campervan, these tips will help.
Tip #1: Get Help
One of the most challenging aspects of building our own campervan was that we had never done it before. I’ve never really done much handyman-type stuff, so I knew I was entering foreign territory when I set out to accomplish this feat. For this reason, I tried to enlist as much help as I possibly could.
The first person I enlisted was my dad since I knew he’d be available to help me throughout the project. He’s done a lot of home improvement projects, so I trust his handyman expertise.

My dad helping me hook up the electrical system
Next, I worked on finding a campervan consultant, someone who builds campervans professionally. I knew this person would be my go-to adviser since they’ve been there, done that, time and time again.
I’d highly recommend working with a professional as you build out your campervan since there are some serious things that could go wrong if you make a mistake. Not only are you working with electrical and plumbing, but you are also working on something that will be exposed to some serious stressors. Your van may be exposed to extreme heat, cold, wind, speeds, and rains. A simple mistake could result in serious injury to you, your fellow passengers, or your van’s interior.
I originally thought we’d be able to build our van simply by watching YouTube tutorials and reading blog articles, but I was wrong. Many online tutorials lack key details or they are not geared towards installing a specific item in your specific vehicle. This is why it helps to have live help from someone who has converted a variety of vans.
To find the right consultant for us, we examined a variety of professional campervan companies online while answering the following questions about each one:
- Location: Where is it located?
- Reviews: What reviews does this location have?
- Picture Quality: How good does their work look?
- Cost: How much does their consulting cost?
- Contact: Have we contacted them yet? What result?
In addition to getting advice from the professional, you may want one who can do some of the harder parts for you (i.e. electric, heater, etc).
The consultant we hired was fairly priced at $100/hour, and we ended up using 7 hours of consulting. It was totally worth it, but I wish we would have searched a little bit longer to find a better consultant. He worked for a campervan company, but he didn’t seem to personally have a lot of experience doing the hard parts of the build out, so he had to constantly ask the company’s electrician for help in answering our questions. Also, he wasn’t available as often as we needed him. I’d highly recommend finding someone who is familiar with every step of building a campervan and who has the time to respond to text messages within a couple hours.
You might also enlist the help of friends you have who have built out a campervan before. Online forums can also be helpful. No matter where you turn for help, just make sure to get as much as you can. Building a campervan is not a road you want to walk alone.
Tip #2: Keep it Simple
The number one mistake people make when they set out to build their own campervan is making it more complicated than it needs to be. Here are a few key ways to keep things simple:
- Keep your required features to a bare minimum. You may think you absolutely need a shower in your campervan, but is it really worth the amount of time it will take to figure out how to make it happen? Remember, you can always add a feature later.
- Don’t try to DIY everything. Every other campervan I’ve seen has custom-built cabinets. When I started thinking about doing this, I got a headache, so I looked around and found well-priced, pre-made cabinets at Lowes. We were able to skip the frustrating process of spending 30+ hours figuring out all the details that go into building DIY cabinets.
- Leave as much empty space as you can. We thought about adding wall cabinets, sliding drawers in the back of the van, and an extra kitchen cabinet, but we decided to go without for the time being. Sure, our van may have fewer features, but having the extra space in the van not only makes it feel more open and homey, it also helps when we want to repurpose a space. For instance, we initially thought both boys would sleep together in the loft bed, but the first night of trying this out proved they were too close for comfort. So, we ended up putting a pack-n-play in the middle of the van for the 2-year-old. After a while of that, we realized the 4-year-old needed access to a toilet, so we ended up putting a bed together in the back of the van under our bed platform. Finally, the 2-year-old started climbing out of the pack-n-play, so we moved him back up to the loft bed! If we didn’t have so much open space, we wouldn’t have had the ability to adjust to the changing needs of our family.
")
Joseph curled up in his new bed under our platform bed
Tip #3: Make Everything Reversible
Like I’ve said before, you never know what you want in your dream campervan until you start living the van life. It takes experience to know what you really want. For this reason, as you build out your van, it helps to approach each feature with the mindset that you may want to undo or redo it at some future point.
Additionally, it isn’t always possible or practical to build your van in the exact order that you want to. We wanted to get our van done as quickly as possible, so we just worked on what we could when we could. We had to wait a while for the solar panels to show up, but we didn’t sit around waiting for them even though that would have logically been the place to start. We just made sure to make the ceiling and walls removable, so we could get the wires back there when the time came.
We actually started by building the bed platforms, which allowed us to visually see what room was left for other key features. We made the bed platforms so that we could get them in and out within 10 minutes without too much trouble. We moved them in and out a few times during the building process just depending on what we were working on at the time.
Here are attachment options in order of most to least reversible:
- Magnets. For items that need to be taken on and off on a daily basis, magnets are a great option. To decide which magnets to use, be sure to check the gauss number to make sure they will be strong enough for your intended purpose. We used neodynium magnets (5,000 Gauss) to attach our sunroof window covers to the ceiling, and we used these strong craft magnets (2,800 Gauss) to attach our regular window covers to the metal of the van.
- L Trac Bolts. As I mentioned before, L Trac acts as an attachment point for all the big items in your van. It was especially useful in helping us create floating platform beds as I will describe in more detail later. L Trac acts as a super strong attachment point that allows you to easily remove whatever you attached it with. Simply loosen the L Trac bolt and whala!
- A Tight Fit. For some items, if you can get them to fit tightly between other objects that will be good enough to hold them in place. For instance, I carefully sized the trim for the sunroofs so that they fit snuggly into place and won’t come loose while driving.
")
The sunroof trim fits tight enough that it stays in without nails or screws
- Adjustable Bungee Cords and Attachment Points. For items that are awkwardly shaped or can’t be screwed in, adjustable bungee cords work really well. We used these to install our microwave, water jugs, dometic toilet, and batteries (within the electric box). They hold objects in really tight, but are still easy enough to remove.
- Bolts. Bolts can be taken on and off as many times as you’d like. The challenging aspect of bolts is that you need to be able to access both sides, so they don’t work in too many situations.
- Screws. Screws can be taken in and out, but only so many times before they wear out. We used screws for our ceiling, and have only needed to remove a ceiling panel once or twice, so it has worked pretty well.
- Glue. Glue should be a last resort because it is very hard to undo. Spray adhesive was very handy during our campervan conversion. We used it for attaching polymat to our bed platforms. I also used it to attach one of the sun roof window frames that wasn’t quite tight enough to stay in place.
HOW TO BUILD A FLOATING BED PLATFORM IN A CAMPERVAN
We started by investigating pre-built options such as the MOAB Elevator Bed, but it was far too pricey for us (a mere $2,850!). We also thought about the HapiJac Power Bed Lift, but we were unsure how we’d make that work with the curved walls of a Sprinter Van.
Eventually, we realized we’d have to DIY the bed platform. We had a hard time finding any decent tutorials online about how to do this, but it turned out to be rather simple using the L Trac as our attachment point. We simply found large L brackets at Lowes that could attach to L trac via the L trac bolts and to the bed platform via regular bolts.

The bed platform is simply made using cheap plywood on top of 2x4s, which is plenty strong enough to hold me, my wife, and our Purple bed (heavy, yet SO comfy!). To prevent the bed platform from scratching the bed, we covered the bed platform with polymat.
HOW TO BUILD AN OVER-THE-CAB LOFT BED IN A CAMPERVAN
We thought for a long time about where the kids would sleep. We thought about a DIY cot over the front seats, the Cabbunk System, and even hammocks. Unfortunately, none of these options quite fit what we wanted since we were looking for something that would give the boys their own space and allow us to keep their bed set up at all times. There is already so much to do to prepare for naptime and bedtime, we didn’t want to add any extra steps such as setting up a bed.
In the end, we decided to find a way to make a permanent loft bed above the seats. This option not only met our requirements, but it utilizes what would otherwise be wasted headspace.
The first challenge with the loft bed was that there was only one place where L trac could be used as an attachment point. For the other five attachment points, we had to get creative. Thankfully, we were able to utilize four pre-existing screws such as the ones that hold up the flaps that block the sun while driving. The sixth attachment point was challenging because it was next to the sliding door. We decided to hang that corner of the bed from the ceiling using a cable.

Six attachment points for the three 2x4s of the loft bed platform
The second challenge was the awkward shape. We wanted it to fill in the entire space, so we put up the 2x4s first, and then created a cardboard template for the plywood. Then we just traced the design onto the plywood and cut it out using a jigsaw.
To keep the boys safe and provide us with privacy, we built a door that swings up and down. To accomplish this, we simply used door hinges and a barrel bolt as a locking mechanism. We keep this area safe using a baby monitor, and nice and cool using a fan for hotter days.

To make it look nice, we covered the bottom of the platform and both sides of the door with the same wood paneling we used for our ceiling. And once again, we covered the bed platform with polymat.

The loft bed doubles as a storage area when not being slept in
Due to the awkward shape of the space and lack of height, we made custom mattresses using 3-inch memory foam from JoAnn Fabric. We cut it to the shape of the space using the cardboard template from before, and then we made mattress protectors using water-resistant fabric.

Will was excited to sleep on his new mattresses!
HOW TO CREATE A WOODEN CAMPERVAN CEILING THE EASY WAY!
We loved the look of the wood plank ceilings that we saw in so many other campervans, but we were nervous about how much extra work it would be to install it plank by plank. In particular, our van came with a ceiling fan and 3 sunroofs, which would make planks even more challenging. So, we decided to simply get wood paneling and cut it to the exact shape of our ceiling.
We measured every nook and cranny of the ceiling, mapped it onto paper, and then measured it out onto the panelling before cutting with a jigsaw. Then we simply attached it to the metal framing of the van using metal screws.

First panel installed! Just three more to go!
I really like the way it turned out. Not only does it look good, but because the panelling is so thin, adding the ceiling didn’t take away much headroom at all. I’m 6 feet tall, and I can stand on my tiptoes!

My dad looking pretty happy after we finally finished installing the ceiling
HOW TO NOT MAKE YOUR OWN CAMPERVAN CABINETS
When we started investigating cabinetry for our campervan, I was shocked by how many people DIY their cabinets from scratch. It just seemed like so much work! We went to Lowe’s and told the lady in the cabinetry area what we wanted to do and she referred us to a custom cabinetry shop (expensive!!!).
Thankfully while I was talking to this lady, Lindsey walked around and found tons of pre-built cabinets sitting on the shelves! We simply measured the size of the fridge/freezer we wanted to put inside there, and then we made sure to buy a cabinet that would fit it. We ended up getting 36-inch and 12-inch-wide unfinished cabinets which were about $80 and $60. All we had to do was paint them!
")
Because we opted for a nice big ICECO 65 Liter Fridge/Freezer, we ended up needing to sand off a little bit of the top of the cabinet door opening, but it worked! We put it on a platform that can slide in and out on 500-pound drawer slides.

Because our cabinets were exactly 48 inches wide when placed next to each other, we were able to buy a super affordable 4-foot piece of butcher block to stain and put on top.

HOW TO MAKE A CAMPERVAN FOOT PUMP SINK USING A REAL KITCHEN FAUCET!
Figuring out the campervan sink was one of the most difficult parts. We went through multiple drains, pipes, and faucets before we finally figured things out.
To start with, we decided to get an over-the-counter vessel sink. We did this because there wasn’t space in the cabinet for the sink to hang down due to our large fridge/freezer.

For the draining system, we ended up getting a sink drain and using a variety of plumbing pipes to get it from the drain to a 6-gallon jug.

For the freshwater, we put water in another 6-gallon jug, which has a pvc pipe going to the bottom of it. The PVC pipe then adapts to a ½-inch flexible hose that connects to a foot pump. Another ½-inch flexible hose comes out of the foot pump and adapts to the hot and cold water taps for a standard kitchen sink.

The hardest part of this was figuring out which adapters to use. I couldn’t find any information about this online. I finally just went into Lowe’s and asked the guy in the plumbing department and he knew exactly which adapters I would need for all the different hoses. So here’s my advice: just tell someone at Lowe’s or Home Depot what you are trying to do, and they will likely be able to help you figure it out.
HOW TO INSTALL YOUR CAMPERVAN’S ELECTRIC SYSTEM WITHOUT ANY PRIOR EXPERIENCE (AND WITHOUT KILLING YOURSELF!)
The electrical system was the most intimidating part of the campervan. I have no prior experience with electrical work, so I was super confused reading blog articles about electrical systems for a campervan. This is where a campervan consultant really comes in handy.
I simply told my campervan consultant what features we needed our electrical system to handle (laptops, microwave, white-noise machines, etc), and he recommended all the components that would meet my needs. He even ordered all the components for me, and their electrical guy cut the big 12V wires for me. They also let me take pictures of one of their existing electrical systems, so my job was to simply put everything together the same way they did.

It doesn’t get more real than climbing on top of your van and screwing solar panels in!
My dad also has experience with electrical stuff, so he was able to help me put it all together as well. Between the consultant and my dad, I was able to figure it all out without killing myself! Not an easy task by any means, but made possible by all the help I received.

Just look at that work of art!
HOW TO MAKE FOLDING, MAGNETIC WINDOW COVERS
Window covers have helped us to sleep well, have privacy, and remain stealthy. Pre-made window covers are hard to find, expensive, and not aesthetically pleasing. For this reason, we decided to make our own. We liked the idea of being able to completely customize it in order to fit our style, our windows, and our storage when not in use.

The finished product being tested out on our sliding door!
Lindsey found instructions on how to do make campervan window covers here. First she enlisted the help of my Mom, and they measured the windows to estimate how much fabric we would need for all of the windows combined - about 8 yards per side. Then Lindsey bought black cotton fabric for the exterior view, a patterned fabric for the interior, magnets, and some thermal foil insulation.
Following the online guide was helpful, but Lindsey had to modify it in a couple ways:
- Instead of using black ripstop fabric use cotton fabric or some other non-slippery fabric. Slippery fabrics are a time-consuming pain to sew, even to a non-slippery fabric.
- Instead of cutting the black fabric 5” out from the insulation like the guide suggests, I would sew the insulation in while leaving extra space on the black fabric. Take it out to your van and place magnets all around the fabric to hold it around the window. This will allow you to see (1) where the magnets will go when sewing in, and (2) the length of fabric edge you need for that particular window.
HOW TO ORGANIZE YOUR CAMPERVAN
Once we got all the main features installed in our campervan, it was time to start packing for our first trip. This is a hugely-important step because having a poorly-organized campervan can make for a stressful journey, especially with kids.
We started by making a list of things we needed in the front of the van (for driving), in the middle of the van (for eating and sleeping), and in the back of the van (for outdoor fun). Once we knew what we needed in each section of the van, we organized them into categories. And from there. we decided on storage containers for each category.
While it can help to have a few permanent storage solutions (i.e. cabinet, dresser, etc), it is far better to use temporary solutions. The reason for this is that what you bring with you on trips is going to change over time. You may think it would be super helpful to have a wall cabinet just for your spice rack, but what if you decide that you hate cooking in your campervan down the road? Soft storage bins, duffel bags, plastic totes, and hooks are great temporary solutions.
IN CONCLUSION
As you can tell, building a campervan takes a lot of hard work, helping hands, and research. If you are not excited about this kind of handyman stuff, I’d recommend buying an RV or hiring a company to build out a campervan for you. On the other hand, if you are excited about the process and are confident you will enjoy the journey, go for it! It is such a rewarding process to build your own travelling vacation home.
If you are planning to build out a campervan for your family, feel free to reach out. I’d love to support you in your efforts to join the van life. And if our travels cross paths, I’ll look forward to checking out your van! See you on the road!
Hi fellow human! Thanks for visiting my personal blog. I’m an intentional family man who is currently passionate about parenting, family culture, homeschooling, and self improvement. This blog isn’t a business. It’s just my way of connecting with people with just as much passion for these topics as me. So, if you enjoy my musings, be sure to reach out.
2 comments to “How We Built a Campervan for Our Family of Four”
Aubrey Coots - March 7, 2021
Can you post finished pictures? I would love to see the perspective from the driving area to the back and the back view from the back doors! Fantastic job!!!! ❤️❤️
Andrew Benjamin George - March 8, 2021
Great suggestion! I’ll try to get those added to the article soon!