
How to Make Your Own Homeschooling Board Game

One of the major reasons we decided to homeschool our kids was to preserve their love of learning. We want our kids to be self-directed learners, learning about the things they are passionate about.
Hi fellow human! Thanks for visiting my personal blog. I’m an intentional family man who is currently passionate about parenting, family culture, homeschooling, and self improvement. This blog is my way of connecting with people with just as much passion for these topics as me. So, if you enjoy my musings, be sure to reach out.
That being said, there are certain things we really want our kids to know. Things that their passions may not lead them to discover on their own. For this reason, we crafted our own homeschooling curriculum consisting of 150+ life skills badges (See “How We Teach Our Kids Life Skills Using 150+ Badges”).

A sampling of our 150+ badges
Badges are earned for demonstrating competency in anything from cleaning their room to gaining a basic knowledge of world history. To demonstrate competency, our kids must demonstrate skills and/or answer questions.
Now, I know a lot of homeschooling parents are wary of tests. Many of us decided to homeschool our kids in order to escape the high-pressure testing environment found in public schools. While the competitive environment of schools is not conducive to learning, it is important to know that testing oneself is proven to be the most effective means of remembering what we’ve learned.1

The problem is that most children do not like being tested. While our kids love earning badges and developing new skills, they’ve refused to answer even the simplest of questions. For this reason, I decided to turn answering questions into a board game.
OUR HOMESCHOOLING BOARD GAME
I wanted our homeschooling board game to be as meaningful as possible so I infused it with both our unique homeschooling curriculum and our family culture (See “How to Build a Strong Family Culture: A Step-by-Step Guide”).
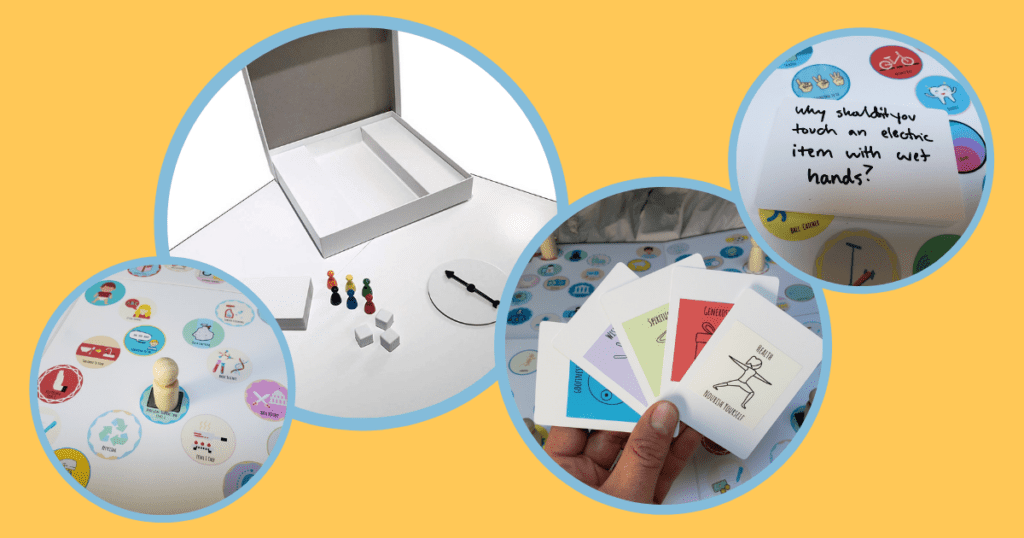
First, I bought a create-your-own board game kit on Amazon, which I was very impressed with. It comes with a game board as well as a variety of tools for jazzing up the game play like a spinner and blank dice.

For the game board, I decided to make each space a picture of one of the badges that the kids can earn to get them even more excited about earning them. I designed the game board in four different sections and printed each section on sticker paper. To protect it from scratches, I then put a layer of Self Adhesive Laminating Sheets on top.

Our homeschooling curriculum is broken down into four different life stages: little boy/girl, big boy/girl, young man/woman, and man/woman. Each section of the game board represents one of these four life stages and as you move from one section into another, your game piece “grows up” into a bigger game piece. For the game pieces, we bought this set of wooden dolls.

Each turn, you roll the dice to see how far you get to move that turn. To make it more fun and increase the difficulty of the math, we created an extra die that adds subtraction and multiplication to the mix.

After moving your wooden doll, the player must try answering a question. Our questions come from our life skills homeschooling curriculum, and we keep them organized based on age category. This way, each player can answer questions related to the badges they are currently working on. As adult players, my wife and I answer questions related to the badges our kids will soon be working on.

After answering a question, the player gets to take 2 family values cards (also made using sticker paper). When you get matching cards, you get to play them in front of you as a match.

Once everyone reaches the finish line, whoever has the most matches wins. To make it less about winning, when you reach the finish line, you get to put a crown on your wooden doll’s head (I searched high and low and finally found some affordable miniature crowns at AliExpress.com).

TIPS FOR MAKING YOUR OWN BOARD GAME
Here are a few tips I have for other parents who want to make their own board game:
- Keep it Simple. We avoided including every single tool the create-your-own board game kit came with such as the spinner. I wanted to make answering questions the main focus of the game.
- Make it Fun. Think about the things that your kids currently like to do. Currently our boys love collecting Pokemon cards. This was the inspiration for making collecting family values cards the object of the game. You could also think about other board games your kids currently enjoy playing and include their favorite aspects of those games.
- Make it Easy to Modify. Write your questions on cards that can easily be swapped in and out. Make it possible to swap different dice in and out to modify the difficulty level of the math. Doing things like this allow you to adjust the game to the changing needs of your children over time.
- Don’t Force It. If your kids are not interested in playing the game, don’t force it on them. The goal is to create a game that your kids are naturally excited to play.
- Don’t Reinvent the Wheel. Take a look on Amazon and you’ll find loads of educational board games for teaching your kids math, geography, reading, etc. Save yourself the trouble and just buy those games. Then focus your homemade board game on skills and questions not found in existing games.
The goal is to create a game that your kids are naturally excited to play.
In Conclusion
Homeschooling your kids can often feel overwhelming and stressful (See “How We Are Planning on Homeschooling Our Kids”). Hopefully building your own homeschooling board game will infuse your homeschooling curriculum with more fun and excitement.
Hi fellow human! Thanks for visiting my personal blog. I’m an intentional family man who is currently passionate about parenting, family culture, homeschooling, and self improvement. This blog is my way of connecting with people with just as much passion for these topics as me. So, if you enjoy my musings, be sure to reach out.
- Make It Stick by Peter C. Brown, Henry L. Roediger III, and Mark A. McDaniel